Top 5 Tips for Selfie Stick LED Lights
In the age of social media, the perfect selfie is a must-have skill. But achieving that flawless shot often requires more than just a good angle and a phone with a decent camera. Enter the selfie stick with LED lights, the ultimate tool for elevating your selfie game. These handy gadgets provide the perfect lighting to ensure your photos are bright, clear, and flattering. This guide unveils the top 5 tips for using selfie stick LED lights effectively, transforming your selfies from ordinary to extraordinary. Whether you’re a seasoned influencer or a casual snapper, these tips will help you master the art of the perfect selfie, enhancing your pictures and boosting your social media presence. Let’s dive into the essentials of choosing, setting up, and using your selfie stick LED lights for the best results possible.
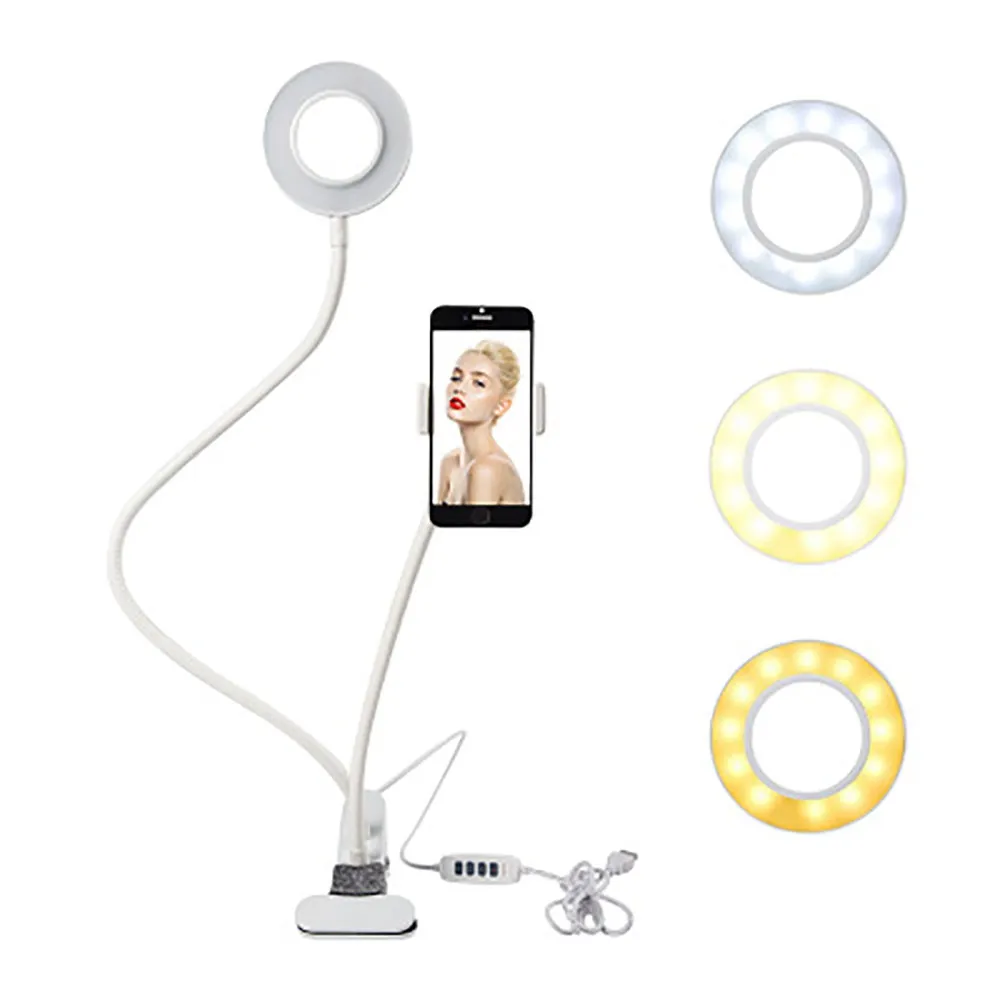
Choosing the Right LED Selfie Stick
Selecting the right selfie stick with LED lights is the first step towards selfie success. Not all selfie sticks are created equal, so understanding the key features to look for can make a significant difference in the quality of your photos. Consider the light temperature, brightness adjustability, and battery life. These features will determine how well the light complements your skin tone and the overall aesthetic of your selfies. Also, think about the build quality and ease of use. A sturdy and user-friendly selfie stick will ensure you can focus on capturing great shots without technical frustrations. Taking the time to research and compare different models will allow you to choose a selfie stick that meets your specific needs and elevates your selfie game.
Consider the Light Temperature

Light temperature plays a crucial role in how your selfies look. LED lights come in various color temperatures, usually measured in Kelvin (K). For selfies, you typically want a light that falls somewhere between warm (around 2700K) and cool (around 5500K). Warm lights create a cozy, inviting feel, which can be flattering for skin tones. Cool lights provide a crisp, clean look that’s great for capturing details. Many selfie sticks offer adjustable color temperatures, allowing you to experiment and find what suits you best. Experimenting with different light temperatures can dramatically change the mood of your photos, making your selfies more versatile and appealing.
Brightness and Adjustability
Adjustable brightness is another essential feature. The ability to control the intensity of the light allows you to adapt to different environments and lighting conditions. When taking selfies outdoors, you might need a brighter light to counteract harsh sunlight. In dimly lit indoor settings, you can use a softer light to create a more subtle effect. Look for selfie sticks that offer multiple brightness levels or a stepless dimming feature for maximum flexibility. This adjustability ensures that your selfies always have the perfect level of illumination, enhancing your features and eliminating unwanted shadows.
Battery Life and Charging
Battery life is an important factor, especially if you plan to use your selfie stick frequently. Consider how long the LED lights can operate on a single charge and how long it takes to recharge. Many selfie sticks use rechargeable batteries, often via a USB connection. Check the battery capacity and the charging time to ensure it fits your needs. A longer battery life means you can take more photos without worrying about running out of power. Consider the charging method as well; a USB charging cable makes it convenient to charge your selfie stick using various power sources, like a power bank or a laptop.
Setting Up Your Selfie Stick LED Lights

Once you have your selfie stick, the next step is setting it up correctly. This involves positioning the lights, adjusting the intensity, and finding the right angle. Proper setup is crucial for achieving the desired lighting effects and enhancing the quality of your selfies. Incorrect setup can result in unflattering shadows, uneven lighting, or a washed-out appearance. Knowing how to position the lights, adjust their intensity, and find the right angle will allow you to capture stunning selfies every time, improving your overall photography experience.
Positioning the Lights Correctly
The position of your LED lights can drastically affect the appearance of your selfies. Ideally, the light should be positioned in front of you to illuminate your face evenly. Avoid positioning the light directly below your face, as this can create unflattering shadows. Instead, try positioning the light slightly above eye level for a more flattering look. Experiment with different angles to see what works best for your face shape and features. Many selfie sticks have adjustable light heads, allowing you to easily change the angle and direction of the light.
Adjusting Light Intensity
Adjusting the light intensity is key to achieving the perfect selfie. The ideal brightness level depends on the ambient lighting in your environment. If you’re in a well-lit area, you might need only a subtle boost from your LED lights. In darker settings, you’ll need to increase the brightness. Most selfie sticks have buttons or dials for adjusting the intensity. Start with a low setting and gradually increase it until you achieve the desired effect. Adjusting the light intensity allows you to balance the light and create the perfect mood for your selfies.
Using the Right Angle

The angle at which you hold your selfie stick also matters. Experiment with different angles to find what flatters your features the most. Holding the stick slightly above your head can create a more slimming effect, while holding it at eye level can result in a more natural look. The goal is to find an angle that highlights your best features and minimizes any imperfections. Try taking a few test shots at different angles to see which ones work best for you.
Mastering the Art of Selfies
Taking great selfies involves more than just good lighting; it’s also about understanding how to pose, utilize natural light, and choose the right backgrounds. The best selfies are often a combination of carefully planned elements, from the angle and lighting to the overall composition of the shot. The more you understand these aspects, the better you can create images that capture your personality and style. Mastering the art of selfies requires practice, experimentation, and a keen eye for detail. Embrace these techniques to enhance your selfies and create stunning visuals.
Finding the Perfect Pose
Your pose can make or break a selfie. Experiment with different poses to find what looks best for you. Consider your body language; a confident stance, a slight tilt of your head, or a genuine smile can make a huge difference. Practice in front of a mirror to see how different poses affect your appearance. Don’t be afraid to try new things and step outside your comfort zone. The perfect pose highlights your best features, creates a sense of personality, and elevates the overall aesthetic of your selfie.
Utilizing Natural Light

While LED lights are essential, don’t underestimate the power of natural light. Whenever possible, try to incorporate natural light into your selfies. Position yourself near a window or go outside during the golden hour (the hour after sunrise and the hour before sunset). Natural light provides a soft, flattering glow that can enhance your skin tone and make your selfies look more natural. Use your LED lights to supplement the natural light, filling in shadows and adding extra brightness. Combining natural and artificial light will give you the best of both worlds.
Experimenting with Different Backgrounds
The background of your selfie can significantly impact the overall look. Choose backgrounds that complement your outfit and personality. A clean, uncluttered background helps to keep the focus on you, while a scenic background can add interest and context to your photo. Experiment with different locations and settings to find what works best. Also, consider the color and texture of the background. A well-chosen background enhances your selfie and tells a story, improving the visual appeal of your images.
Editing Your Photos Effectively
Post-processing is a vital step in the selfie-taking process. Photo editing allows you to fine-tune your images, enhance your features, and create a polished final product. There are numerous editing tools and techniques available, from simple adjustments to advanced retouching. Editing your photos effectively ensures that your selfies look their best and reflect your unique style. By using the right editing techniques, you can correct any imperfections, enhance your skin tone, and create visually stunning images.
Using Photo Editing Apps

There are countless photo editing apps available, each offering various features and tools. Popular options include VSCO, Snapseed, and Facetune. These apps allow you to adjust brightness, contrast, and saturation, as well as apply filters and retouch imperfections. Experiment with different apps to find one that suits your needs and preferences. Familiarize yourself with the tools and learn how to use them effectively. This will help you create professionally edited selfies that stand out. Select the apps with features that can enhance skin tones, refine details, and add a touch of creativity to your photos.
Enhancing Skin Tone
One of the most important aspects of editing selfies is enhancing your skin tone. Use tools in your chosen photo editing app to smooth your skin, reduce blemishes, and even out your complexion. Be careful not to overdo it, as excessive editing can make your photos look unnatural. Subtle adjustments are key to achieving a natural, flattering look. Focus on enhancing your skin tone to create a healthy, radiant glow. Experiment with different settings to find the right balance between enhancing your features and maintaining a realistic appearance. Proper skin tone enhancement is crucial for taking selfies that look professional and appealing.
Adding Filters Strategically
Filters can add a unique touch to your selfies, but it’s important to use them strategically. Choose filters that complement your skin tone and the overall aesthetic you’re aiming for. Avoid using filters that dramatically alter your appearance or make your photos look over-edited. Opt for filters that enhance the natural colors and tones of your photos. Consider the mood and atmosphere you want to create and select filters that align with your vision. Use filters sparingly to enhance your selfies without making them look artificial or overprocessed. The right filter can elevate your selfie and give it a polished, professional appearance.
Maintaining and Caring for Your Selfie Stick

Proper maintenance and care will prolong the life of your selfie stick and ensure it continues to perform well. Regular cleaning, careful storage, and addressing any issues promptly will help keep your selfie stick in top condition. By taking good care of your equipment, you ensure that you’ll always have a reliable tool for capturing beautiful selfies, which can be an essential tool for any photography enthusiast.
Cleaning Your LED Lights Regularly
Keep your LED lights clean by wiping them down regularly with a soft cloth. Dust and smudges can affect the light output and the quality of your photos. Make sure the lights are turned off and unplugged before cleaning. Avoid using harsh chemicals or abrasive materials that could damage the LEDs or the housing. Regular cleaning will ensure that your lights produce the best possible illumination, enhancing the quality of your selfies.
Proper Storage
When not in use, store your selfie stick in a safe place to protect it from damage. Avoid exposing it to extreme temperatures or direct sunlight. If your selfie stick has a carrying case, use it. This will prevent scratches and other damage. Storing your selfie stick properly will extend its lifespan and ensure it’s always ready for your next selfie session. Good storage practices are essential for maintaining the quality and functionality of your equipment.
Troubleshooting Common Issues
Occasionally, you might encounter issues with your selfie stick, such as the lights not working or the stick not extending properly. If your lights aren’t working, check the battery level and the connections. Ensure the lights are switched on and that the batteries are charged. If the stick won’t extend, check for any obstructions or damage. Consult the manufacturer’s instructions or online resources for troubleshooting tips. Knowing how to address common issues can save you time and frustration. If you cannot fix the problem, contact the manufacturer for assistance.