What is a Skin Whitening Editor Online
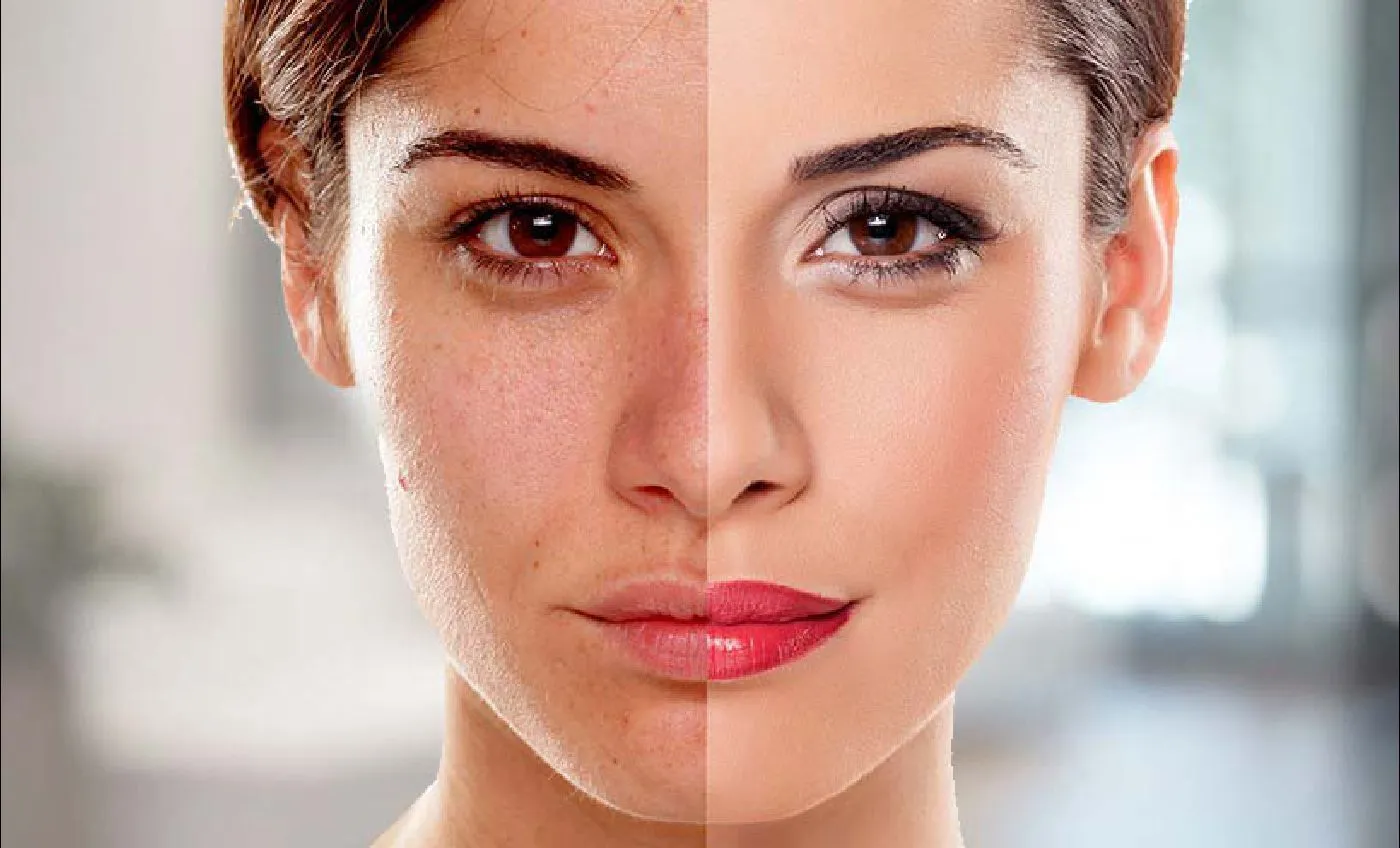
In today’s digital age, the pursuit of flawless skin has led to the rise of skin whitening editors online. These tools, whether accessed through software, web-based platforms, or mobile applications, offer users the ability to alter the appearance of their skin in photographs. By utilizing a range of features, such as brightness and contrast adjustments, color correction tools, and specific skin smoothing filters, individuals can achieve a lighter, more even skin tone in their images. It is crucial to understand that these editors are primarily designed for cosmetic enhancements within the realm of digital photography, not for medical treatments or changing one’s natural skin color. The appeal of these tools lies in their accessibility, offering users the chance to enhance their appearance in a quick, convenient, and often cost-effective manner, allowing them to present the best versions of their photos on various digital platforms.
Benefits of Using a Skin Whitening Editor
There are several benefits associated with using a skin whitening editor online, making it a popular choice for both amateur and professional photographers. Firstly, these tools can correct uneven skin tones caused by lighting inconsistencies during photo sessions, ensuring a more uniform and polished look. Secondly, they can help to minimize the appearance of blemishes, such as acne scars, age spots, and minor imperfections, thus enhancing the overall visual appeal of the image. Moreover, skin whitening editors often include features that can improve the overall aesthetic quality of a photo, adding a touch of glamour or professional finish. Furthermore, for those working in the fashion or beauty industry, these tools can be invaluable in quickly preparing images for online portfolios, social media, or marketing materials, saving both time and resources. Ultimately, skin whitening editors can be a valuable asset, provided they are used responsibly and in moderation.
Understanding Different Skin Whitening Techniques

Skin whitening editors offer a variety of techniques to achieve the desired effect, each influencing the final outcome differently. One common approach is the adjustment of brightness and contrast, which can subtly lighten the skin tone. Another technique involves color correction, where users can adjust the hue and saturation of specific colors, such as yellow or red, to reduce imperfections and achieve a more even tone. Sophisticated editors also include features like skin smoothing, which reduces the visibility of wrinkles and fine lines, providing a more youthful appearance. Frequency separation is another advanced technique, where textures are manipulated without altering the base skin tone, allowing for enhanced details without creating an artificial look. For the best results, it is important to experiment with these tools to find the balance that creates a natural and appealing result. Careful adjustments of these features, coupled with thoughtful application, can help to avoid common pitfalls like an over-whitened or artificial appearance.
Photo Editing Software
Photo editing software, installed on your computer, gives you the most control. Programs like Adobe Photoshop and GIMP (a free alternative) offer sophisticated tools for skin whitening. These tools include precise selection tools, layers, and masking options, allowing for detailed and nuanced adjustments. Professional software requires a learning curve but provides the ability to make complex changes and achieve highly realistic results. When selecting such software, consider your skill level and the features you need. Look for a program that has tutorials, skin smoothing filters, color correction tools, and retouching capabilities. Also, evaluate the user interface to ensure ease of use. Despite the learning curve, professional software is often preferred for high-quality results, which provides the flexibility for more complex editing tasks. Proper training and practice are essential to use this software effectively, making it ideal for serious photographers, graphic designers, or anyone requiring high-quality skin enhancements.
Online Photo Editors
Online photo editors provide an accessible alternative to software-based programs. Websites like Fotor, PicMonkey, and Canva offer a wide range of features directly through your web browser. They are user-friendly and require no installation, offering quick and easy ways to whiten skin. These editors typically feature simpler tools such as one-click adjustments and basic color correction options, making them suitable for beginners. Online platforms offer the advantage of being accessible from any device with an internet connection, and most offer free versions with premium options available through subscription. If you seek convenience and simplicity, online editors are a great option. However, remember that these may have fewer advanced tools than desktop software, limiting the extent of detail and nuance in your edits. They remain perfect for casual users and those who want to enhance images quickly without the complexity of desktop applications.
Mobile Apps for Skin Whitening

Mobile apps have revolutionized photo editing, and skin whitening apps are no exception. Apps such as Facetune, YouCam Perfect, and BeautyPlus are designed specifically for enhancing selfies and portraits. These apps offer a range of features, including automatic skin smoothing, teeth whitening, and the ability to reshape facial features. Their convenience and ease of use make them exceptionally popular among social media users. Many apps provide one-tap editing options, and real-time previews, streamlining the editing process. While they excel at quick touch-ups and superficial enhancements, the filters and automated adjustments may sometimes produce artificial-looking results. Mobile apps are best suited for individuals who want to enhance images on the go. They are perfect for quick edits before sharing on social media platforms. To avoid over-editing, it is important to use these apps in moderation and to be mindful of maintaining a natural look.
Step by Step Guide How to Whiten Skin Online
Whitening skin online involves a few key steps, regardless of the tool you choose. Firstly, select the editor that matches your needs and upload your photo. Then, familiarize yourself with the tools available, such as those for brightness, contrast, and color adjustments. Start by making subtle adjustments to the overall brightness and contrast to lighten the skin tone gently. Next, use tools like the skin smoothing brush or filters to reduce blemishes and create a smoother texture. Adjust the color balance to minimize any redness or yellow tones. Proceed by applying the changes and assessing the results. Make small adjustments and zoom in to examine details. Regularly compare your edited version with the original image to avoid over-processing. Save your work in a suitable format like JPEG or PNG and consider the platform where the image will be used, for example, social media. Remember to approach the process with moderation, aiming for a realistic and polished finish.
Choosing the Right Editor
Selecting the correct skin whitening editor depends largely on your technical skills, budget, and needs. For beginners, mobile apps or easy-to-use online editors are ideal. They provide simple tools and automated features. For intermediate users, online editors with more features and desktop software, such as GIMP, can give you more flexibility. Professional photographers or designers should consider advanced photo editing software like Adobe Photoshop. Free software is a good place to start. Examine reviews, tutorials, and sample images before deciding. Also, evaluate the editor’s ease of use, features offered, and the compatibility with your device or operating system. Consider whether the editor provides customer support and whether it meets your specific editing needs. Ultimately, the best editor is the one you’re most comfortable using and that produces the results you desire consistently.
Uploading and Opening Your Photo

To start whitening your skin online, the initial step is to upload and open your photo within your chosen editor. Most platforms support common file formats, like JPEG and PNG. Locate the upload or import button, usually located on the editor’s homepage, and select the image from your computer or device. Once uploaded, the photo will appear in the editing workspace. Take time to review the image, zooming in if necessary to assess its quality. Also, check for any potential issues, such as low resolution or imperfections. Once the image is open, you can move to the next phase, which involves utilizing the whitening tools available to refine your skin tone.
Using the Whitening Tools
After uploading and opening your photo, the next step is to use the whitening tools within your chosen editor. Most editors offer a combination of tools designed to lighten and even out skin tones. The most fundamental tools include the brightness and contrast adjustments. Start by gently increasing the brightness, and decreasing contrast slightly to create a lighter appearance. Color correction tools, such as those adjusting hue and saturation, will help remove imperfections and correct color casts. More advanced editors offer specific skin-smoothing filters to minimize imperfections and texture. Experiment with these tools in moderation, often making subtle adjustments. Pay attention to the natural look, and zoom in to review details. Practice with the various tools to achieve a balanced and realistic result.
Adjusting Brightness, Contrast, and Saturation
Adjusting brightness, contrast, and saturation are central to skin whitening, offering precise control over the image’s appearance. Brightness controls the overall lightness of the image. Increase this gradually to lighten the skin. Contrast measures the difference between light and dark areas. Slightly decreasing contrast can soften the image, but too much may make the photo look flat. Saturation determines the intensity of colors. Reduce saturation if the skin looks too red or yellow. When adjusting, start with subtle changes. Always compare your edits with the original. Be careful not to overdo any of these adjustments, as it can lead to an unnatural appearance. The key is to achieve a balance that lightens the skin while maintaining the natural vibrancy and texture. Always strive for subtlety and precision.
Refining the Details

Once the basic adjustments are completed, refining the details is crucial to achieving a realistic skin whitening effect. This involves using tools like the clone stamp or healing brush to remove blemishes, scars, and other imperfections. Employ skin smoothing filters to reduce the appearance of fine lines and wrinkles, but avoid excessive smoothing, which can result in an unnatural, plastic look. Pay attention to areas where the skin texture changes, such as around the eyes and mouth, and carefully blend the edits for a seamless transition. Fine-tuning the details requires patience and precision. Zoom in to examine your work, and frequently compare the edited version with the original. When done correctly, the refined details will improve the overall look of the image, and will make the subject look radiant and natural.
Common Mistakes and How to Avoid Them
Several common mistakes can easily ruin the results of skin whitening. One frequent issue is over-whitening, where the skin appears excessively pale and artificial. Avoid this by making subtle adjustments, and comparing your edits to the original. Another mistake is neglecting the skin texture, which results in a plastic-like look. To avoid this, use skin smoothing filters carefully and retain some texture. Another mistake is not considering lighting. Edit the image to match the direction and quality of the light. Overlooking the color balance can lead to an unnatural color. Correct this by adjusting hues and saturation. The best practice is to make small adjustments, and regularly assess the results. By being aware of these mistakes, users can create more natural-looking and visually appealing results, and avoid common pitfalls.
Over-Whitening Your Skin
Over-whitening is one of the most common mistakes when editing skin tones. The result is often a washed-out appearance, where the skin looks unnaturally pale and lacking in texture. To avoid this, begin with gentle adjustments to brightness and contrast. Regularly compare the edited image with the original to ensure you’re not straying too far from the natural appearance. Pay attention to areas where the skin transitions to other features, such as the eyes or lips. Over-whitening also tends to remove all shadows and highlights, leading to a flat, artificial look. The aim should be to enhance the skin tone subtly, creating a brighter, more even complexion without removing its natural depth and character. Careful, measured adjustments are crucial for achieving a realistic and appealing final result. Using the editor’s before and after views is useful to assess your edits and adjust your technique.
Ignoring Skin Texture

When skin whitening, it is easy to overlook the importance of maintaining skin texture, which gives the skin depth and realism. Excessive use of smoothing tools can create a plastic-like appearance that looks artificial. To avoid this, use smoothing tools sparingly and focus on reducing blemishes without completely eliminating texture. Zoom in to assess the details, and make sure that the skin maintains some level of natural roughness. Consider using techniques like frequency separation. These techniques allow for the manipulation of texture separately from the skin tone. The ultimate goal is to improve the look of the skin without making it look artificial. The best results are achieved through a balanced approach, focusing on both tone and texture to create a polished yet realistic image.
Not Using Natural Lighting
Natural lighting plays a crucial role in photography, as it greatly influences how we perceive skin tone. When editing, it’s essential to be aware of the original lighting conditions in your photo and to edit accordingly. If the photo was taken in bright sunlight, your edits should reflect the highlights and shadows created by that light. Conversely, if the photo was taken in soft, diffused lighting, your edits should be more subtle to maintain the natural look. Ignoring the lighting conditions can lead to an unnatural, inconsistent appearance. Always consider the direction and intensity of the light in the original image. Adjust the brightness, contrast, and color balance to enhance the skin tone while still reflecting the lighting of the environment. Doing this will ensure your edits blend in seamlessly with the rest of the image. By working with the lighting, you can improve the overall quality and realism of your edits.
Enhancing Your Online Presence
Using skin whitening editors can significantly enhance your online presence, especially on platforms where visual appeal is important. By improving the appearance of your skin, you can increase your confidence in sharing photos and videos. This, in turn, can lead to a more engaging online profile. A better appearance can also boost your professional image, which is useful for job applications, portfolios, and networking. However, remember to maintain authenticity and transparency. Use these tools to subtly enhance your natural beauty, rather than creating an entirely different appearance. Strive for a realistic look, that reflects your true self. Authenticity and a sense of self-acceptance will resonate with others and enhance your online presence more than heavily edited images.
Creating a Consistent Look

Establishing a consistent look across your online profiles helps build a recognizable personal brand, and it makes your images look professional and cohesive. This can be achieved by using the same editing techniques across all your photos. Save your favorite settings and apply them consistently. If you have multiple photos, edit them together to maintain uniformity. The main goal should be a balance between a natural appearance and a polished result. This process gives your profile a cohesive style. Consistent editing makes your content more engaging and promotes brand recognition, which is especially important for influencers, artists, and those in visual industries. Your audience will recognize and trust your style, which helps to boost engagement, build a stronger brand, and enhance your online presence.
Using Skin Whitening Editor for Social Media
Skin whitening editors are widely used to enhance images for social media platforms, such as Instagram, Facebook, and TikTok. These tools help users create a more polished and visually appealing presence. This can lead to increased engagement and more followers. Before sharing your photos, always consider the platform’s aesthetic and the expectations of your audience. For example, Instagram users often prefer images that are bright, clean, and visually appealing. Be mindful of over-editing, which can lead to an inauthentic image. The goal is to improve your appearance and maintain some of the natural texture. By using these tools strategically, you can enhance your social media profile and connect more effectively with your audience. However, transparency and authenticity are key to building trust and credibility. Do not exaggerate, and consider showing a ‘before and after’ comparison to maintain trust.
Ethical Considerations of Skin Whitening
When using skin whitening editors, ethical considerations should always be kept in mind. While enhancing images is widely accepted, it is important to avoid promoting unrealistic beauty standards. Always be mindful of the potential impact of your edits, particularly on vulnerable audiences, such as young people. Over-editing can lead to body image issues and can damage self-esteem. Strive for a natural and authentic look. Transparency is also critical. Be open about your editing practices. This helps to build trust and manage expectations. Acknowledge that your images are edited, and show that you value your natural appearance. By being mindful of these considerations, you can use these tools responsibly and contribute positively to a healthy online environment. Remember that self-acceptance and diversity should always be promoted, and that true beauty comes from within.